HOW TO ADD SSL CERTIFICATE TO WORDPRESS ON HOSTINGER: COMPLETE BEGINNER’S GUIDE
INTRODUCTION
I made a rookie mistake when I first launched my WordPress site on Hostinger. I didn’t add an SSL certificate. For three weeks, my site was running on HTTP instead of HTTPS.
Then Google sent me a notification. My site was being marked as “Not Secure” in search results. Traffic dropped. Users were getting warnings when they tried to access my site.
I panicked. But then I realized how simple SSL actually was on Hostinger.
Twenty minutes later, my site had HTTPS, the warnings disappeared, and my rankings started recovering. I wish I’d done it on day one.
The good news? Hostinger makes adding SSL incredibly simple. It’s literally a few clicks. In this guide, I’ll walk you through exactly how I did it.
WHY SSL MATTERS MORE THAN YOU THINK
Before we get technical, let me explain why SSL is non-negotiable.
SSL (Secure Sockets Layer) is the technology that turns your site from HTTP to HTTPS. That little padlock icon next to your URL? That’s SSL.
Here’s what SSL does:
Encrypts data between your visitor’s browser and your server
Tells Google your site is trustworthy
Stops showing “Not Secure” warnings
Improves your search rankings
When I didn’t have SSL, I didn’t just lose credibility – I lost traffic. My conversion rates dropped because visitors didn’t trust a site marked “Not Secure.”
Google treats HTTPS as a ranking signal. Sites with SSL rank higher than sites without it. It’s that simple.
The worst part? Hostinger offers free SSL certificates. There’s literally no excuse not to use it.
After I added SSL, my site recovered within two weeks. Users returned. Rankings improved. All from one simple action.
HOSTINGER’S FREE SSL: YOUR BIGGEST ADVANTAGE
Here’s what I love about Hostinger – they give you free SSL on almost every plan.
Most hosting providers make you pay extra for SSL. Hostinger includes it for free. This is a massive advantage that most users don’t even realize they have.
When you sign up for WordPress hosting on Hostinger, you automatically get access to free SSL certificates powered by Let’s Encrypt. You just need to enable it.
The best part? It’s completely automatic after setup. The certificate renews itself every 90 days. You literally set it once and forget about it.
STEP 1: ACCESS YOUR HOSTINGER CONTROL PANEL
First, log into your Hostinger account at hpanel.hostinger.com.
Once you’re logged in, you’ll see the main dashboard. Look for your website in the list. Click on it to access your hosting settings.
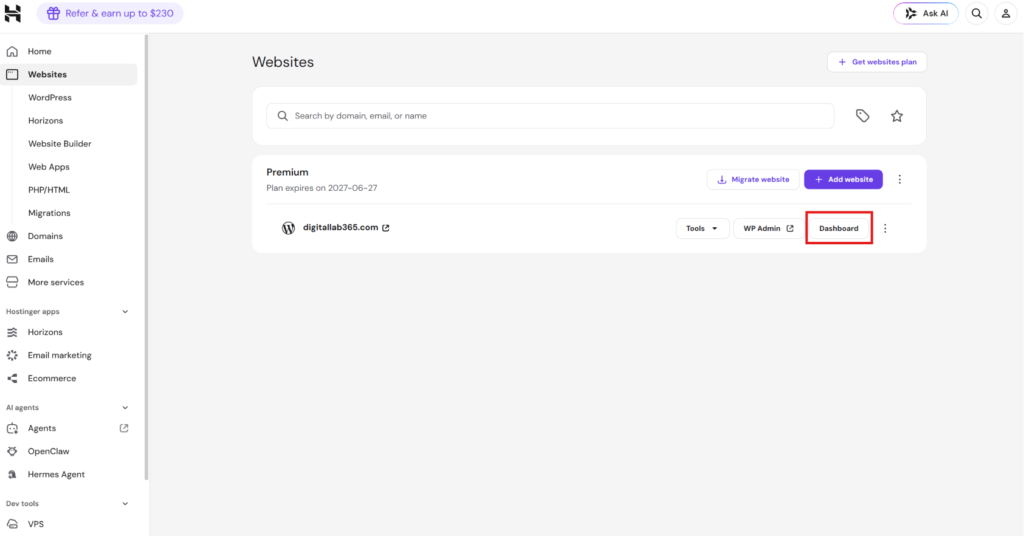
You should see several options on the left sidebar. Look for an option labeled “Security” or “SSL & Security.”
On Hostinger’s newer interface, you might also see “Website” and then “Security Settings” underneath it.
STEP 2: LOCATE THE SSL CERTIFICATE SECTION
Navigate to the SSL certificate management area. Different versions of Hostinger show this slightly differently, but it’s always easy to find.
Look for “SSL Certificate,” “Security,” or “HTTPS” options.
Click on it. You should see your current SSL status.
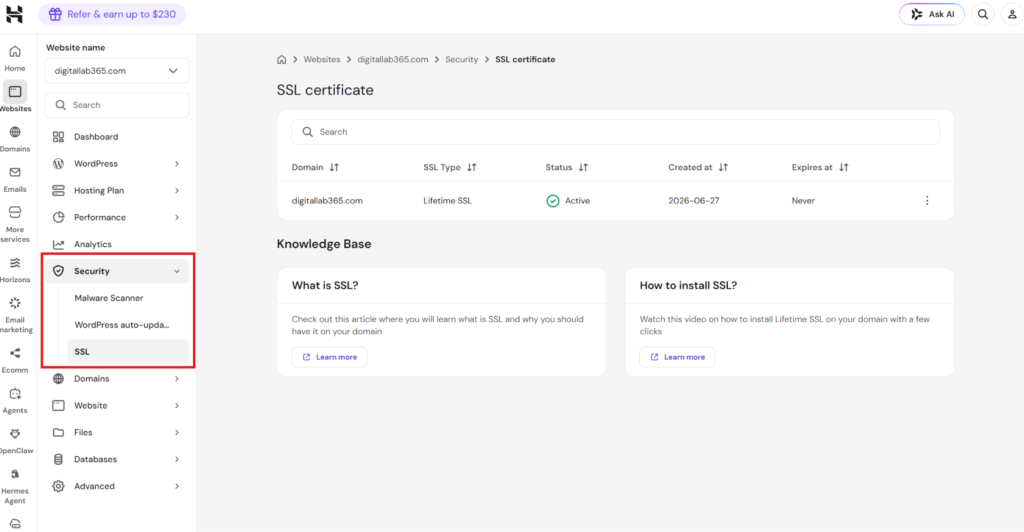
You might see a button that says “Install SSL,” “Enable SSL,” or “Get Free SSL.”
Click that button. Hostinger will often have this enabled by default, but if it shows as disabled, enable it now.
STEP 3: CHOOSE YOUR FREE SSL CERTIFICATE
Hostinger will ask which type of SSL certificate you want. For almost everyone, the free Let’s Encrypt certificate is perfect.
Let’s Encrypt is trusted by all major browsers. It provides the same encryption as expensive certificates. The only difference is the price – free instead of hundreds of dollars.
Select the free Let’s Encrypt option if given a choice. Then click install or confirm.
The installation usually takes just a few minutes. Hostinger handles everything automatically.
STEP 4: ENABLE AUTOMATIC RENEWAL
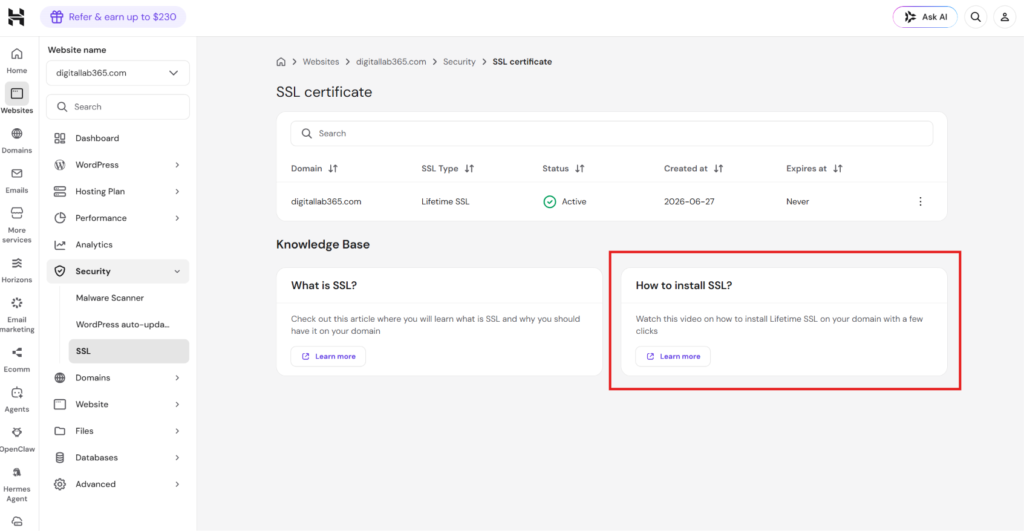
After your SSL installs, make sure automatic renewal is enabled.
This is important because SSL certificates expire every 90 days. Hostinger automatically renews yours, but you want to verify this is turned on.
Look for an option like “Auto-renew” or “Automatic Renewal.”
Toggle it on if it’s not already enabled.
You’ll never have to think about SSL expiration again.
STEP 5: UPDATE YOUR WORDPRESS SETTINGS
Now that SSL is installed on your server, you need to update WordPress to recognize it.
Log into your WordPress admin dashboard (usually yourdomain.com/wp-admin).
Go to Settings → General.
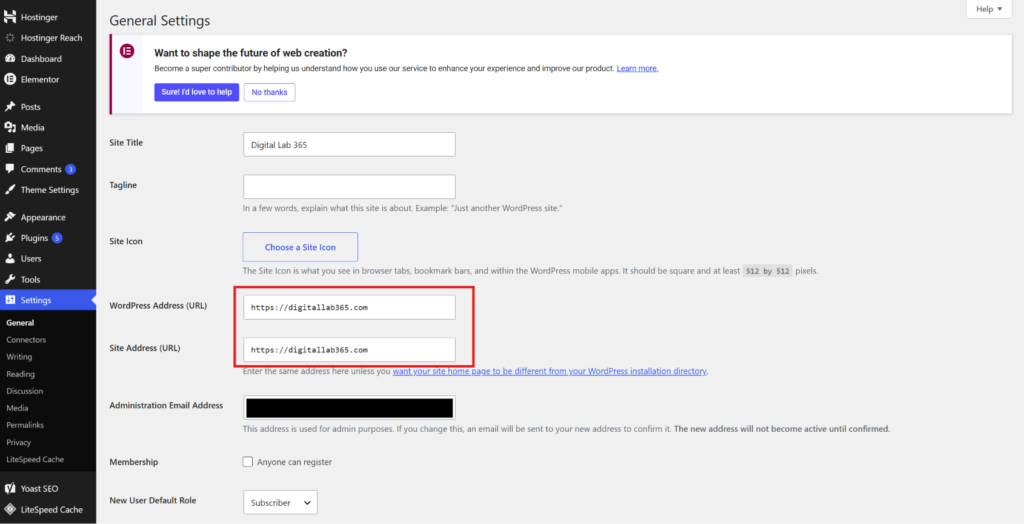
You’ll see two fields:
WordPress Address (URL): Change from http:// to https://
Site Address (URL): Change from http:// to https://
Update both URLs from http to https. For example:
Before: http://yourdomain.com
After: https://yourdomain.com
Click “Save Changes” at the bottom.
Your WordPress site is now running on HTTPS.
STEP 6: FORCE HTTPS FOR ALL TRAFFIC
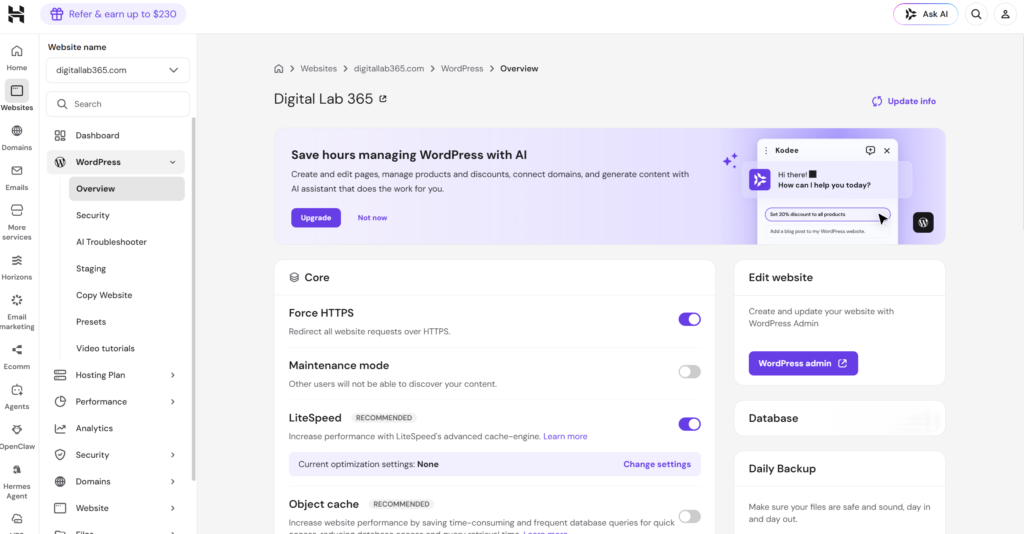
SSL is now active, but you should force all traffic to use HTTPS. This ensures visitors always connect securely.
In Hostinger’s settings, look for an option like “Force HTTPS” or “Redirect HTTP to HTTPS.”
Enable this setting. This automatically redirects anyone who tries to visit your site on HTTP to the secure HTTPS version.
STEP 7: TEST YOUR SSL CERTIFICATE
Don’t just assume it worked. Test it.
Open your website in a browser. You should see a small padlock icon next to your URL in the address bar.
If you see the padlock, your SSL is working perfectly.
If you see a warning or error, try clearing your browser cache and reloading the page. Sometimes browsers cache the old HTTP version.
If issues persist, you might need to run a redirect optimization. This is rare with Hostinger, but it happens.
STEP 8: UPDATE INTERNAL LINKS
Here’s something most people miss – after switching to HTTPS, your internal links might still point to HTTP URLs.
Search your WordPress database for any remaining http:// links and update them to https://.
You can do this manually by going through your posts, or use a plugin to find and replace all instances at once.
This ensures no mixed content warnings appear.
STEP 9: MONITOR YOUR SEARCH RANKINGS
After implementing SSL, Google will re-crawl your site. Your search rankings might dip slightly for a few days as Google adjusts.
This is normal. Within two weeks, you should see rankings stabilize and often improve.
I personally saw my rankings recover within 10 days, and some keywords actually ranked higher than before.
Track your rankings before and after SSL implementation. You’ll likely see positive movement.
WHY YOU SHOULDN’T DELAY THIS
I’m telling you from experience – don’t wait to add SSL. Do it today.
Every day your site runs on HTTP, you’re losing potential visitors and rankings. Google favors HTTPS. Users trust HTTPS.
The setup literally takes 15 minutes on Hostinger. There’s no complexity. No technical knowledge required.
NEXT STEPS AFTER SSL
Now that your site is secure with HTTPS, you should also focus on overall security and performance.
Make sure you’ve installed essential security plugins. A strong foundation with SSL plus security plugins is incredibly powerful.
Also, if you haven’t optimized your WordPress security setup yet, read the complete guide on WordPress security best practices. SSL is just the beginning – you need defense in depth.
If you want to maximize your site’s speed, the guide on how to speed up WordPress on Hostinger covers performance optimization techniques that work perfectly alongside SSL.
For those who recently installed WordPress, make sure you’ve configured everything correctly. The complete guide on installing WordPress on Hostinger walks through the entire process including SSL setup at the right time.
And if you’re worried about your data, the guide on backing up WordPress on Hostinger ensures you’re protected even if something goes wrong.
FINAL THOUGHTS
SSL is the foundation of a secure, trustworthy website. It’s not optional anymore – it’s essential.
On Hostinger, adding SSL is so simple that there’s no reason to skip it.
Do it today. Twenty minutes from now, your site will be secure, your visitors will see the padlock icon, and you’ll stop losing rankings to that “Not Secure” warning.
This is one of those rare changes that’s both incredibly easy and incredibly impactful.
Your future traffic will thank you.